Cocotb is a convenient way to write your hardware verification tests in Python. Let’s see how to use it with the OSS toolchain.
The example used in this article is available on Github, so you can see the complete example there.
Installing Dependencies
Once again I will reuse the distrobox container introduced in the first article of this series as the development system.
First, let’s create a project directory somewhere.
Let’s place our HDL in src/hdl and our test sources in test.
Then let’s create test/requirements.txt with this content:
cocotb==1.9.2
cocotbext-wishbone
This specifies the python packages we want to use in our testbench. Please note that OSS CAD Suite already uses a release candidate of cocotb 2.0. We want to stick to version 1 for now, so we’ll have to downgrade.
Ideally, we would do all our package installation in a Python venv like this:
python3 -m venv .venv
source .venv/bin/activate
Unfortunately, venv support is currently broken in OSS CAD Suite, see issue 138. Using the system python executable is also not possible, see issue 80.
As venvs are currently broken, we will install the dependencies in the system location.
Please note that you might have to clean up $HOME/.local/bin and $HOME/.local/lib/python3.* if you already have those libraries installed there.
cd test
python3 -m pip install -r requirements.txt
The Wishbone Slave
The Wishbone slave code is quite simple and is essentially the code presented in the ZipCPU Blog, with signals renamed to match the NEORV32 style. For your convenience, here is the full code:
module neosd (
    input clk_i,
    input rstn_i,

    input[31:0] wb_adr_i,
    input[31:0] wb_dat_i,
    input wb_we_i,
    input[3:0] wb_sel_i,
    input wb_stb_i,
    input wb_cyc_i,

    output reg wb_ack_o,
    output wb_err_o,
    output reg[31:0] wb_dat_o
);
    // Wishbone code based on https://zipcpu.com/zipcpu/2017/05/29/simple-wishbone.html
    wire wb_stall_o;

    always @(posedge clk_i) begin
        if (wb_stb_i && wb_we_i && !wb_stall_o) begin
            // Your write logic here, such as
            // memory[i_addr] <= i_data;
        end
    end

    always @(posedge clk_i) begin
        case (wb_adr_i)
            32'h0: wb_dat_o <= 32'h00000000;
            default: wb_dat_o <= 32'h00000000;
        endcase
    end

    always @(posedge clk_i) begin
        if (rstn_i == 1'b0)
            wb_ack_o <= 1'b0;
        else
            wb_ack_o <= (wb_stb_i && !wb_stall_o);
    end

    assign wb_stall_o = 1'b0;
    assign wb_err_o = 1'b0;

endmodule
The Testbench
With the basic module ready, we have to write the testbench. It consists of two parts: Various wrapper files to set up cocotb and the actual testbench in Python.
Wrapper Files
First, we will need a top-level file in test/tb.v wrapping our Wishbone slave:
`default_nettype none
`timescale 1ns / 1ps

module tb ();

    initial begin
        $dumpfile("tb.vcd");
        $dumpvars(0, tb);
        #1;
    end

    reg clk;
    reg rstn;

    reg[31:0] wb_adr_i;
    reg[31:0] wb_dat_i;
    reg wb_we_i;
    reg[3:0] wb_sel_i;
    reg wb_stb_i;
    reg wb_cyc_i;

    wire wb_ack_o;
    wire wb_err_o;
    wire[31:0] wb_dat_o;

    neosd dut (
        .clk_i(clk),
        .rstn_i(rstn),

        .wb_adr_i(wb_adr_i),
        .wb_dat_i(wb_dat_i),
        .wb_we_i(wb_we_i),
        .wb_sel_i(wb_sel_i),
        .wb_stb_i(wb_stb_i),
        .wb_cyc_i(wb_cyc_i),

        .wb_ack_o(wb_ack_o),
        .wb_err_o(wb_err_o),
        .wb_dat_o(wb_dat_o)
    );

endmodule
The initial begin block ensures to dump all signals to tb.vcd.
The remaining module simply instantiates the neosd Wishbone slave.
Top-level signals will be driven by the Python testbench.
In addition, we need the Makefile, which I have adapted from the Tiny Tapeout template:
# Makefile
# See https://docs.cocotb.org/en/stable/quickstart.html for more info

# defaults
SIM ?= icarus
TOPLEVEL_LANG ?= verilog
SRC_DIR = $(PWD)/../src/hdl
PROJECT_SOURCES = neosd.v

# RTL simulation:
SIM_BUILD = sim_build/rtl
VERILOG_SOURCES += $(addprefix $(SRC_DIR)/,$(PROJECT_SOURCES))

# Allow sharing configuration between design and testbench via `include`:
COMPILE_ARGS 		+= -I$(SRC_DIR)

# Include the testbench sources:
VERILOG_SOURCES += $(PWD)/tb.v
TOPLEVEL = tb

# MODULE is the basename of the Python test file
MODULE = test

# include cocotb's make rules to take care of the simulator setup
include $(shell cocotb-config --makefiles)/Makefile.sim
For now, we’ll use iverilog as simulator.
It is slower than Verilator but has the huge benefit of supporting high-impedance and undefined signal states.
This makes it easier to see if you forgot to properly assign signals, or if your reset logic is broken.
Although not strictly required, a .gitignore file is also quite useful.
The Main Python Test
Now for the interesting part: The main testbench.
As already indicated by the requirements.txt file, we will make use of the cocotbext-wishbone library.
The testbench file then first contains all required imports:
import cocotb
from cocotb.clock import Clock
from cocotb.triggers import ClockCycles

from cocotbext.wishbone.driver import WishboneMaster
from cocotbext.wishbone.driver import WBOp
Next, we define the test and log a start message:
@cocotb.test()
async def test_project(dut):
    dut._log.info("Start")
Let’s create a 100 MHz clock:
    # Set the clock to 100 MHz
    clock = Clock(dut.clk, 10, units="ns")
    cocotb.start_soon(clock.start())
We can now configure the cocotbext-wishbone driver:
    wbs = WishboneMaster(dut, "", dut.clk,
        width=32,
        timeout=10,
        signals_dict={"cyc":  "wb_cyc_i",
                    "stb":  "wb_stb_i",
                    "we":   "wb_we_i",
                    "adr":  "wb_adr_i",
                    "datwr":"wb_dat_i",
                    "datrd":"wb_dat_o",
                    "ack":  "wb_ack_o" })
I’m not yet sure how to handle the byte write enable and the error signal with this library.
Then perform the reset sequence:
    # Reset
    dut._log.info("Reset")
    dut.rstn.value = 0
    await ClockCycles(dut.clk, 3)
    dut.rstn.value = 1
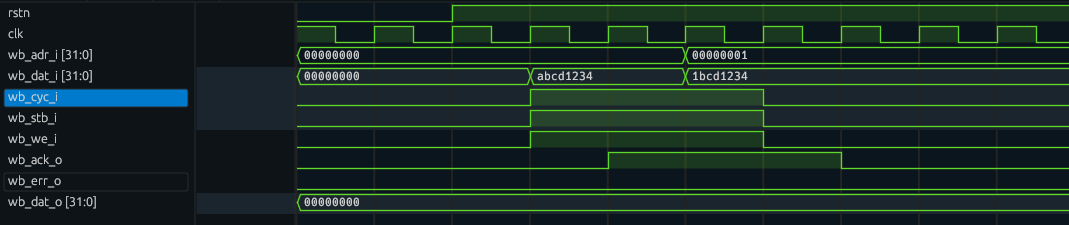
As the final step, let’s issue two write requests to the slave.
Let’s write 0xabcd1234 to address 0 and 0x1bcd1234 to address 1:
    await wbs.send_cycle([WBOp(0, 0xabcd1234), WBOp(1, 0x1bcd1234)])
    await ClockCycles(dut.clk, 3)
We also wait 3 clock cycles in the end to slightly extend the waveforms.
Running the Simulation
with all the setup in place, running the simulation is simple:
cd test
make
This is the beginning of the output you should get:
rm -f results.xml
"make" -f Makefile results.xml
make[1]: Entering directory '/home/jpfau/Dokumente/Projekte/FPGA/neosd/test'
/opt/oss-cad-suite/bin/iverilog -o sim_build/rtl/sim.vvp -D COCOTB_SIM=1 -s tb -g2012 -I/home/jpfau/Dokumente/Projekte/FPGA/neosd/test/../src/hdl -f sim_build/rtl/cmds.f  /home/jpfau/Dokumente/Projekte/FPGA/neosd/test/../src/hdl/neosd.v /home/jpfau/Dokumente/Projekte/FPGA/neosd/test/tb.v
rm -f results.xml
MODULE=test TESTCASE= TOPLEVEL=tb TOPLEVEL_LANG=verilog \
         /opt/oss-cad-suite/bin/vvp -M /opt/oss-cad-suite/lib/python3.11/site-packages/cocotb/libs -m libcocotbvpi_icarus   sim_build/rtl/sim.vvp
     -.--ns INFO     gpi                                ..mbed/gpi_embed.cpp:108  in set_program_name_in_venv        Using Python virtual environment interpreter at /opt/oss-cad-suite/bin/python
     -.--ns INFO     gpi                                ../gpi/GpiCommon.cpp:101  in gpi_print_registered_impl       VPI registered
     0.00ns INFO     cocotb                             Running on Icarus Verilog version 13.0 (devel)
     0.00ns INFO     cocotb                             Running tests with cocotb v1.9.2 from /opt/oss-cad-suite/lib/python3.11/site-packages/cocotb
     0.00ns INFO     cocotb                             Seeding Python random module with 1741120577
     0.00ns INFO     cocotb.regression                  Found test test.test_project
     0.00ns INFO     cocotb.regression                  running test_project (1/1)
     0.00ns INFO     cocotb.tb                          Start
     0.00ns INFO     cocotb.tb                          Reset
VCD info: dumpfile tb.vcd opened for output.
...
You can then open test/tv.vcd in surfer to view the simulation waveform: